Imagine looking up at your roof on a bright morning and seeing those solar panels gleaming, but feeling a nagging worry that something might be off.
Maybe you’ve just finished a long day of work and the last thing you want to think about is cleaning dust off a roof that’s already doing its job for you.
That’s where solid solar panel maintenance comes in – it’s the quiet hero that keeps your system humming efficiently year after year.
In our experience at Pep Energy, we’ve seen homeowners panic when a sudden dip in output turns into a costly repair, but a simple routine can prevent that drama.
So, what does a practical solar panel maintenance plan look like for a residential homeowner who just wants reliable power without becoming a full‑time technician?
First, think about the easy wins: a quick visual check each season, wiping away bird droppings or leaves that could shade a cell, and confirming that all mounting brackets are still tight.
Next, schedule a professional inspection at least once a year – the pros can test voltage, check inverter health, and spot micro‑cracks that the naked eye misses.
You might wonder, ‘Do I really need that?’ Think about the money you saved when a clean panel generates 10% more electricity – that’s often enough to cover the inspection fee many times over.
And if you have a solar battery or are under a lease, staying on top of maintenance protects your investment and keeps warranty claims smooth.
Bottom line? A little habit now saves you headaches later, and it lets you enjoy the peace of mind that comes from knowing your panels are doing exactly what you paid for.
Ready to make solar panel maintenance part of your routine? Grab a soft brush, set a reminder on your calendar, and let us handle the technical checks so you can focus on living.
TL;DR
Solar panel maintenance is as simple as a regular seasonal visual check, a quick brush‑off of debris, and tightening any loose brackets.
Add an annual professional inspection and you’ll keep your system humming, save on energy bills, protect warranties, and enjoy reliable power all year without becoming a full‑time technician.
Step 1: Ensure Safety and Shut Down the System
Before you even think about climbing onto the roof, take a moment to picture yourself standing on a sturdy ladder, feeling the wind, and realizing that a single slip could turn a routine check into a nightmare. That’s why the first thing we always tell our customers is: safety comes first.
Start by turning off the inverter. Most residential systems have a clear “shutdown” button or a dedicated disconnect switch near the inverter unit. If you can’t locate it, the owner’s manual (or a quick glance at the Solar Energy Systems: A Professional Guide to Design, Installation, and Maintenance) will show you exactly where.
Next, flip the main AC disconnect. This is the big lever that cuts power from the grid to your panels. Once it’s in the off position, you’ve isolated the system and can safely inspect without the risk of electric shock.
But here’s a little nuance most guides skip: if you have a solar battery, you also need to disengage its isolation switch. Batteries store high voltage, and even when the inverter is off, they can still feed power back into the array.
Now, grab a basic safety kit – a pair of insulated gloves, safety glasses, and a non‑slip ladder. Make sure the ladder is on stable ground; a wobbly base is a recipe for disaster. And yes, you should always have a friend nearby to hold the ladder or call for help if something goes sideways.
Do you remember the last time you had a home renovation project? If you’re planning any roof work before your panels go up, you might run into permit issues. That’s where Understanding Pergola Permit Requirements can be surprisingly useful – the same permitting process often applies to structural changes that affect solar installations.
Once the system is shut down, do a quick visual sweep. Look for loose bolts, cracked seals, or any debris that could cause shading. If you spot anything odd, it’s worth calling a pro – and for that kind of structural fix, LGFMH Construction offers reliable roof and exterior repairs that pair nicely with solar work.
Here’s a simple checklist you can print out and stick on your fridge:
- Turn off inverter.
- Flip AC disconnect.
- Isolate battery (if applicable).
- Wear gloves and glasses.
- Secure ladder on level ground.
- Do a visual inspection for loose hardware.
When you’ve crossed every box, you’re ready to move on to cleaning or deeper maintenance. And if you ever feel unsure, pause – it’s better to wait for a professional than to rush and cause damage.
That video walks you through the exact steps of shutting down a typical residential inverter, so you can follow along with the checklist.

Step 2: Clean the Solar Panels Properly
Now that the system is completely offline, you can roll up your sleeves and tackle the grime that’s been stealing sunshine from your panels.
When is the right time?
Imagine you’re about to wash a car on a scorching afternoon – the paint could crack. Solar panels feel the same way. Aim for a cool, overcast morning or late‑afternoon when the surface is under 70°F. If a gentle rain has just passed, let the panels dry a bit before you start; the rain already did half the job.
Gather your “clean‑only” toolbox
- Long‑handled soft‑bristle brush (think garden brush, not steel wire)
- Bucket of lukewarm water
- Drop of mild, biodegradable soap (a splash of Dawn works fine)
- Hose with a spray nozzle set to a gentle flow
- Rubber‑soled shoes, safety glasses, and a sturdy ladder or harness if you must step onto the roof
We always tell residential homeowners to stay on the ground whenever possible. A 10‑foot extension pole lets you reach the panels without climbing.
Step‑by‑step cleaning routine
1. Rinse lightly. Turn on the hose on a low setting and sweep water across the panel surface. This knocks off loose dust and bird droppings without scratching the glass.
2. Apply the soap solution. Dip the brush into the bucket, give it a quick swirl, then gently scrub in a top‑to‑bottom motion. Focus on spots with stubborn grime – think of those black streaks you see after a windy summer.
3. Rinse again. Use the hose to wash away any soap residue. Residue can act like a thin film and shave off a few percent of output, so be thorough.
4. Dry the edges. A soft squeegee or a plain microfiber cloth can push water off the edges. The sun will finish drying the rest, and you’ll see the panels sparkle.
If you live in a dusty desert or near a construction site, you might need to repeat this routine every three months. In greener climates, twice a year usually keeps efficiency humming.
Real‑world examples
One of our Phoenix customers noticed a 12% dip in production after a month of no rain. A quick clean using the steps above brought the output back up within a week. Another homeowner in Seattle waits for a light drizzle, then simply rinses with a hose – no soap needed – and still sees a noticeable boost.
Bonus: Reduce future cleaning
Consider a hydrophobic coating that makes water bead off the glass. DFI’s protective glass coating is a DIY option that can extend the time between washes and even improve efficiency by up to 5% according to their data.
And if you’re unsure about the exact frequency for your location, the how‑to‑clean‑solar‑panels guide offers a handy checklist that matches climate, panel tilt, and shading.
Quick checklist before you call it a day
- System shut off and locked?
- All safety gear on?
- Low‑pressure rinse completed?
- Soap‑and‑brush applied gently?
- Rinsed thoroughly and edges dried?
- Document date and any observations in your maintenance log.
When you finish, flip the inverter back on, watch the production numbers climb, and give yourself a pat on the back. A clean panel is a happy panel, and that happiness shows up on your electric bill.
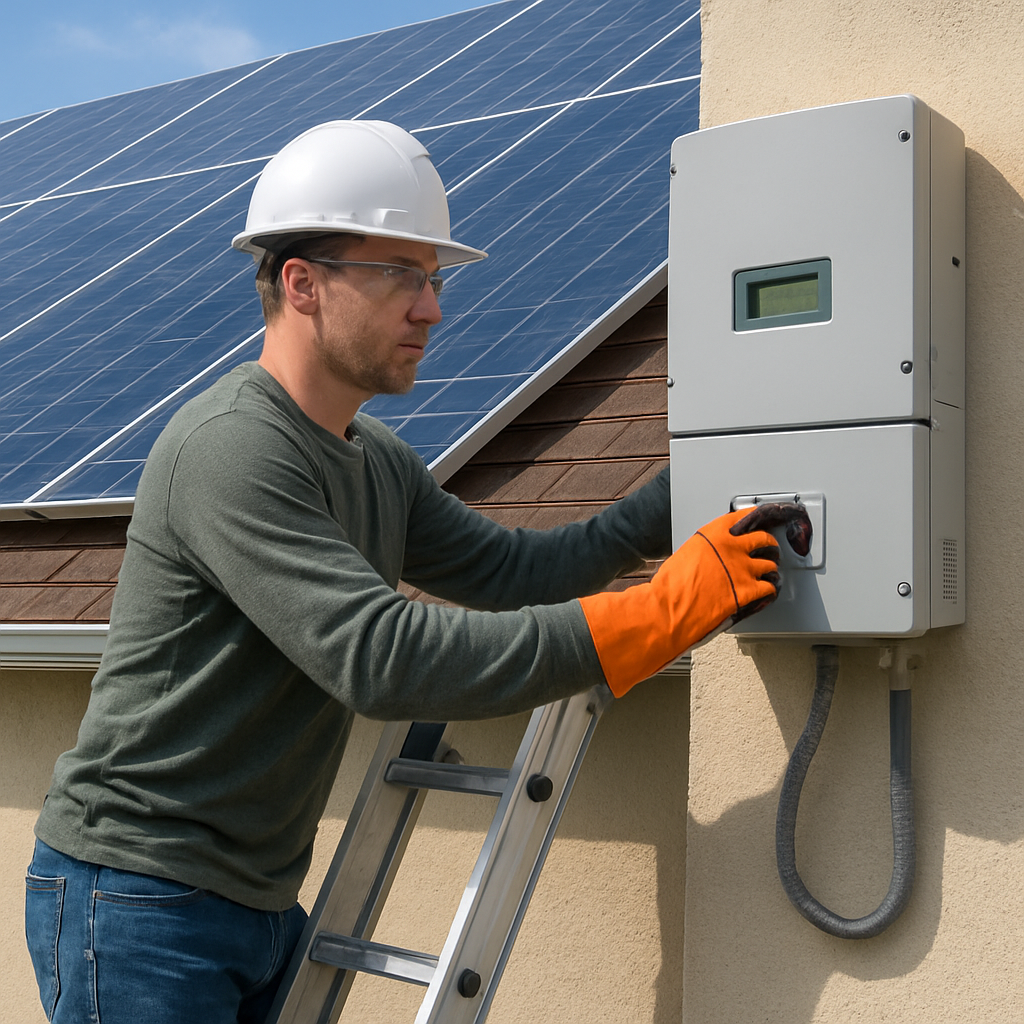
Step 3: Inspect Wiring and Electrical Connections
Why this matters
Even the cleanest panel can’t give you power if a loose terminal or a chewed wire is stopping the current. In our experience, wiring problems are the #1 cause of unexplained output drops, and they’re often fixable in under ten minutes.
What to look for
Start with a low‑light visual sweep. Walk around the array and check each conduit, junction box, and connector for:
- Loose or missing screws on terminal lugs
- Corroded copper or silver‑colored buildup
- Pinched or frayed cables where they pass through brackets
- Evidence of wildlife – nests, gnawed insulation, or droppings
Does that sound familiar? One of our Phoenix residential customers noticed a sudden 8% dip in production after a summer thunderstorm. A quick glance revealed a single terminal that had backed out during a gust. Tightening it restored the numbers within a day.
Step‑by‑step inspection
1. Power‑down verification. Double‑check the DC disconnect is locked and the inverter is off. Safety first – you don’t want a surprise voltage spike while you’re fiddling with wires.
2. Use a flashlight and magnifier. Spot tiny cracks or corrosion that the naked eye might miss. A little rust at a lug can increase resistance and shave off a few percent of output.
3. Test continuity. Grab a basic multimeter, set it to continuity, and probe each connection. If the meter doesn’t chirp, you’ve got a loose or broken link that needs tightening or replacement.
4. Check torque. Many manufacturers specify a torque range for terminal screws (often 0.5–1.0 Nm). If you have a torque wrench, give each screw a gentle twist. Too tight can crush the conductor; too loose lets the connection heat up.
5. Look for ground and arc‑fault indicators. Modern inverters often flash a warning light if they detect a fault. If you see an amber LED, note the code in the inverter manual and investigate the corresponding wiring segment.
Real‑world examples
A small‑business owner in New Jersey reported intermittent outages that stumped his IT team. Our technician traced the issue to an arc‑fault caused by a rodent chewing a conduit near the inverter. Replacing the conduit and adding a low‑profile metal guard eliminated the problem and saved the business over $1,200 in lost production last year.
Another case involved a commercial rooftop in Maryland where a pinched wire in a tight bend was overheating. A thermal camera showed a hotspot of 140°F – well above the safe 105°F limit. After reseating the cable with a proper bend radius, the hotspot vanished.
Quick checklist for wiring health
- System still shut down?
- All terminals tight and corrosion‑free?
- Continuity test passed on each connector?
- No signs of wildlife damage?
- Inverter fault LEDs clear?
- Document any findings and actions taken.
For a deeper dive on the most common wiring issues and how professionals address them, see this list of typical solar panel maintenance problems from a reputable solar service provider.
Once you’ve verified everything’s secure, lock the DC disconnect back up, flip the inverter on, and watch the production numbers climb. A well‑wired system is the silent hero that keeps your solar panel maintenance routine paying off day after day.
Step 4: Check Mounting and Structural Integrity
Alright, you’ve shut down the system, cleaned the glass, and tightened the wires. The next thing that can silently sabotage your harvest is a loose bracket or a roof that’s starting to sag.
Why mounting matters
Think of the mounting hardware as the skeleton that holds the panels up to catch the sun. If a bolt loosens, the panel can tilt just a few degrees and you’ll lose anywhere from 3‑5 % of output, according to field studies. In extreme cases a failed mount can rub against the roof membrane and eventually cause a leak.
And it’s not just about power – a failed mount is a safety hazard. A panel that detaches in a wind gust can damage property or even start a fire if the wiring gets ripped.
Spot‑check the roof and rails
Grab a ladder or, if you’re uncomfortable, a telescoping pole and give each rail a quick visual once a season. Look for these red flags:
- Rust or corrosion on aluminum rails, especially near roof seams.
- Missing or cracked washers and nuts – a common sign after a storm.
- Visible roof decking damage under the brackets (water stains, rot, or warped sheathing).
- Any movement when you push gently on a panel; it should feel solid, not wobble.
Does that sound like a lot? It’s actually a quick five‑minute walk‑around once you know what to hunt for.
Real‑world examples
Last summer a Phoenix homeowner told us his system was under‑producing by 9 % after a series of high‑wind days. A visual scan revealed a single mounting screw had sheared off, letting the panel tilt just enough to cast a shadow on its neighbor. Re‑tightening the screw restored full output within a day.
In a commercial warehouse in Illinois, heavy snow accumulated to 30 lb/ft² – well above the design load for the original mount. The snow’s weight warped the steel rails, creating a 2‑inch gap between the panel and its bracket. After installing additional reinforcement brackets, the system passed a post‑winter performance test with zero loss.
Actionable steps
Here’s a step‑by‑step routine you can follow during your quarterly maintenance swing:
- Gather tools. You’ll need a torque wrench (0.5–1.0 Nm range for most residential kits), a flashlight, a small mirror, and a notebook.
- Verify shutdown. Double‑check the DC disconnect is still locked.
- Inspect each rail. Use the flashlight to shine into the rail‑to‑roof interface. If you spot corrosion, wipe it with a rag and apply a UV‑stable sealant.
- Tighten bolts. Apply the torque wrench to the manufacturer’s spec (usually stamped on the bracket). Too tight can crush the rail; too loose invites movement.
- Check roof integrity. Look for cracked shingles, lifted flashing, or water stains. If you see any, call a roofing pro – a compromised roof will eventually affect the mounting.
- Document. Snap a photo of each bracket, note any torque values you adjusted, and log the date.
Pro tip: If you live in a high‑wind zone (winds > 80 mph) or get heavy snowfall, schedule a semi‑annual check instead of once‑a‑year. The extra eyes can catch fatigue before it becomes a costly repair.

If you want a printable version of the full checklist, the detailed inspection checklist from Exactus Energy breaks down every component, from rails to grounding.
And for commercial roofs that need extra reinforcement, Preferred Roofing Services offers a guide on integrating panels with roof decks – a handy read if you manage a larger property.
Bottom line? A solid mount is the quiet backbone of solar panel maintenance. Tighten, inspect, and document, and you’ll keep your system humming for years without surprise outages.
Step 5: Test Performance and Monitor Output
Now that the brackets are tight and the panels are spotless, it’s time to ask the real question: is the system actually delivering the power you expect? That’s where testing and monitoring swoop in.
Why performance checks matter
Even a perfectly clean panel can under‑perform if something subtle is off – a micro‑crack, a shading issue you missed, or a inverter that’s starting to drift. In our experience, a quick performance snapshot can catch a 5‑10% drop before it turns into a $200‑plus bill.
Grab the right tools
All you really need is a handheld multimeter or, better yet, a solar monitoring app that talks to your inverter. Many modern inverters have built‑in data portals; they’ll show real‑time voltage, current, and daily kWh. If you’re managing a larger commercial array, a drone equipped with a thermal camera can spot hot spots that signal faulty cells – a technique highlighted in a recent tool comparison guide.
Step‑by‑step performance test
1. Record baseline output. After you’ve turned the inverter back on, log the system’s current power (watts) at three different times of day – morning, noon, and late afternoon. Write these numbers in your maintenance notebook.
2. Compare to expected values. Most panels are rated at a certain wattage under Standard Test Conditions (STC). Adjust for temperature and irradiance using the inverter’s performance ratio (PR). If your PR consistently sits below 80%, something’s amiss.
3. Check each string. If your inverter can isolate strings, look for one that’s under‑producing. A string that’s 10% low often points to a shading issue or a loose connector you missed earlier.
4. Run a voltage drop test. With the system still off, measure the voltage at the panel’s terminals and again at the inverter input. A drop of more than 5% could indicate resistance in wiring or corroded terminals.
5. Scan for hot spots. If you have access to a thermal camera (or a drone with one), sweep the array on a sunny day. Darker patches mean less heat, brighter spots mean a cell is working harder – both are red flags.
What to do with the data
If you spot a dip, start small: clean any new debris, tighten any suspect connections, and re‑measure. Still low? It might be time to call a pro for an inverter diagnostic or to replace a panel that’s cracked.
Document every reading, the date, and any action you took. Over months, you’ll see trends – maybe your system loses a couple percent each winter, which is normal, or maybe a particular string always lags, hinting at a chronic issue.
Quick checklist before you finish
- System shut down, then powered back on.
- Baseline power logged at three times.
- Performance ratio checked.
- String outputs compared.
- Voltage drop measured.
- Thermal scan (if available) completed.
- All observations recorded.
Stick to this routine twice a year – once after the hottest months and once after the coldest – and you’ll keep your solar panel maintenance on point, catching problems before they bite.
Step 6: Choose a Professional Service – Comparison of Options
Now that you’ve cleaned, tightened, and tested, the next question is who should actually do the heavy‑lifting when something goes wrong. Picking the right pro can feel like choosing a mechanic for a classic car – you want expertise, transparency, and a price that makes sense for your budget.
What to look for in a solar panel maintenance provider
First, ask yourself: does the company specialize in O&M (operations and maintenance) for residential rooftops, or are they a generic electrician who dabbles in solar? Look for certifications from NABCEP or a proven track record with the inverter brand you have.
Second, check response time. A roof leak or a sudden 10% dip in output can cost you money fast. Companies that promise a 48‑hour on‑site visit usually have the logistics in place.
Third, compare pricing structures. Some firms charge a flat annual fee, others bill per visit, and a few offer a performance‑based model where they only get paid if they improve your output.
Three common routes you’ll see on the market
1. Local specialist teams. In the Northeast, Solar Medix runs a dedicated O&M program that covers everything from panel cleaning to full inverter diagnostics. Their focus on small‑scale residential systems means they can often spot a loose connector that a bigger player might miss. Solar Medix O&M services also offer a warranty on labor, which can be a safety net if you’re on a lease.
2. Manufacturer‑backed service plans. Many inverter manufacturers bundle a maintenance contract with the purchase. The upside is you get factory‑trained technicians who know the firmware inside‑out. The downside is the cost can be higher, and the contract may lock you into a specific brand for future upgrades.
3. DIY monitoring plus annual professional audit. Some homeowners invest in a monitoring platform (often included with modern inverters) and schedule a once‑a‑year on‑site audit from a third‑party contractor. This hybrid approach lets you catch small inefficiencies yourself and only call a pro when the data flags a serious issue.
Quick comparison table
| Feature | Local specialist (e.g., Solar Medix) | Manufacturer plan | DIY + annual audit |
|---|---|---|---|
| Typical cost (annual) | $150‑$250 | $300‑$500 | $0 (monitor) + $120‑$180 audit |
| Response time | 24‑48 hrs | 72‑96 hrs | Self‑diagnose; 48 hrs for audit |
| Warranty on labor | Yes, 1 yr | Usually included | No |
Actionable steps to pick the right partner
- Make a shortlist of three providers that serve your zip code.
- Request a written scope that lists cleaning, wiring inspection, mounting check, and performance testing.
- Ask for a recent case study – a real‑world example of a 12% output recovery after a cleaning‑plus‑tightening visit.
- Verify insurance and certifications (NABCEP, local licensing).
- Calculate the break‑even point using your average monthly savings; the NREL cost benchmark shows the average residential system saves about $1,200 per year, so a $200 service pays for itself quickly.
Bottom line: don’t just go with the lowest price. A service that catches a hidden wiring fault or replaces a failing bypass diode can protect you from a $1,000 repair down the road. Take a moment now to line up the options, run the quick checklist, and lock in the partner that gives you both peace of mind and a healthier solar panel maintenance routine.
Conclusion
We’ve walked through every step, from safely shutting down your system to cleaning the glass, tightening loose connections, inspecting mounts, and finally testing output. Each of those tasks might feel like a small chore, but together they keep your panels humming and protect the big investment you made.
So, what’s the biggest takeaway? Consistency beats perfection. A quick visual check each season, a gentle rinse when dust builds up, and an annual professional inspection are enough to catch most issues before they turn into costly repairs.
Think about the last time you noticed a dip in your bill. Did you pause to wonder if a loose bolt or a dusty panel was to blame? Next time, pull out your maintenance log, glance at the checklist, and give that component a once‑over. You’ll be surprised how often a simple tighten‑up restores 5‑10 % of output.
In our experience at Sean Whitmer, homeowners who stick to a routine see fewer warranty headaches and enjoy steadier savings year after year. If you’re ready to lock in that peace of mind, grab a notebook, set a calendar reminder, and make your solar panel maintenance a habit.
Remember, a well‑maintained system not only saves you money—it keeps your home or business powered reliably, rain or shine.
FAQ
How often should I perform solar panel maintenance?
In practice, a quick visual check each season is enough to spot obvious debris or loose bolts. For actual cleaning, aim for a light rinse twice a year in most climates—once in spring after the pollen surge and once in fall before leaves build up. If you live in a dusty desert or near construction, add a third spring‑time wash. The key is consistency: a habit beats a once‑in‑a‑blue‑moon overhaul.
Do I need a professional inspection, or can I handle everything myself?
DIY work covers the low‑risk items: visual checks, gentle cleaning, and tightening obvious loose brackets. However, a professional inspection once a year catches hidden problems like micro‑cracks, inverter drift, or subtle voltage drops that you can’t see with the naked eye. In our experience at Sean Whitmer, the average homeowner saves about $150‑$250 annually by catching a wiring fault early, so think of the pro visit as insurance, not a luxury.
What’s the safest way to clean my panels without voiding the warranty?
First, always shut down the system and lock the DC disconnect—safety first, warranty second. Use a soft‑bristle brush or a long‑handled squeegee, a bucket of lukewarm water, and a tiny drop of mild, biodegradable soap if grime is stubborn. Rinse with low pressure; never spray water directly into the inverter or wiring box. Let the panels air‑dry or pat the edges with a microfiber cloth. Following these steps keeps the glass pristine and the warranty intact.
How can I tell if a wiring issue is affecting my system?
Start with the inverter’s fault LEDs—most modern units flash a code when a string under‑performs. Next, run a quick continuity test with a multimeter on each connector while the system is still shut down; a silent “chirp” means the path is solid. If you notice a sudden 5‑10 % drop in daily kWh without a visible reason, that’s a strong hint the wiring is the culprit. Tighten or replace the suspect terminal and re‑measure.
What impact does seasonal weather have on solar panel maintenance?
Winter snow can add weight that stresses mounting brackets, so give the rails a visual once after a heavy storm. In hot, dry summers, dust and pollen cling to the glass, shaving off 1‑3 % of output per month if left unchecked. Autumn brings leaf litter that can shade panels for weeks. Adjust your maintenance calendar: a quick rinse after the first heavy rain of spring, a bracket check after any wind event over 50 mph, and a final inspection before the heating season starts.
Can I track the results of my maintenance efforts?
Most inverters now offer a web‑based monitoring portal where you can log daily production. Write down the date you cleaned or tightened something, then compare the kWh numbers for the next week. A typical gain after a proper clean is 5‑10 %, which shows up as a noticeable bump on the chart. Keeping a simple spreadsheet with columns for “Date,” “Task,” and “Production Change” turns vague intuition into concrete data you can show to a future service tech.


